How to make a perfect Cauliflower Pizza crust

Ok ok so I know it’s not REAL Pizza, but once you get this right you may just fall in love with this pizza alternative. I’ve tried many alternatives to my fave doughy delight; broccoli base pizza, even pizza swapping normal flour for nut flour. They were all lovely, but I have to say this is by far my favourite pizza base alternative. Especially now I have mastered it! (Yes I is the master!).

There are plenty of recipes out there for low carb, flourless pizzas, but most don’t ACTUALLY give you a dough like texture. For me its all about textures (taste is also a must but that goes without saying right?!). If I am looking to kill a craving without crippling my tummy, or if I have that bikini body in mind, then the KEY is to trick my brain into feeling like I am eating the real deal. Sounds a bit crazy, but trust me it works wonders! A lot of your cravings are in your head, like smoking for example, most people are addicted to the feeling of holding the cigarette, popping it into their mouths then inhaling and exhaling, rather than the actual nicotine. I am a like that with food. Give me a healthy replacement and I can guarantee it will satisfy my craving, and what’s even better is I DON’T feel like I am carrying a 3 month old baby right after eating! RESULT!

I’ve experimented with this recipe a few times and although all times have been delicious, this last time I finally got the dreeeeaaam texture AND I was able to pick it up without it breaking or crumbling! Yaaaay! This it the type of pizza crust to fool your family and friends with, the kids will never know either (word to you mothers!). Its also the type you will want to eat again and again!

What you will need (makes two pizza bases) :

  • 1kg cauliflower florets, riced
  • 1 egg beaten (flax egg for vegans)
  • ⅓ cup soft goats cheese (chevre) or cottage cheese. (vegans get a vegan friendly one- I’ve used it before. As long as the texture is right it will work!)
  • 1 teaspoon of baking powder
  • 1 teaspoon dried oregano
  • 1 teaspoon of dried basil
  • pinch of salt
  • 1 tablespoon of tapioca starch (optional but great to get that desired dough like base )

SO, the secret to this mixture is very simple:

  1. Blend cauliflower chunks into rice like texture.
  2. Once you have blended the chunks of cauliflower, steamed it in boiling water for 3- 5 minutes.
  3. Drain the steamed cauliflower in a fine-mesh strainer. Then transfer it into a clean,thin dishtowel.

Wrap the cooked cauliflower up in the towel (see picture) and STRAIN as much water out of it as you can get out of it! Squuuueeeeze and squeeeeze! (Gives you a little workout too!).

You will be amazed at how much water comes out! After this arm workout you should  not only be left with toned arms BUT a lovely dry mash like texture.

4. Add the mixture to a large bowl, mix up your strained rice, beaten egg, goat/cottage cheese, and herbs. Mix WELL. (This means getting your hands dirrrtyyy, don’t be afraid to use your hands!)

Remember, it wont feel like your typical pizza dough but it will still hold together so don’t worry!

Press your dough out onto a baking tray lined with parchment paper. (It’s important that it’s lined with parchment paper!). Keep the dough quite thin and raised slightly on the corners to get that desired pizza crust (the raised sides is totally optional but definitely recommended for the ultimate cheat pizza!)

Now its ready to BAKE! Yaaaay!

Bake it for 25-35 minutes at 190 degrees. Meanwhile you can be cooking any toppings you may want to add. I have had chicken and veg, Steak and veggies, just cheese, just veggies, or even added an egg to the middle!

Once the base is cooked add your toppings- tomatoe cheese etc and pop back in the oven to allow the cheese to melt! Ensure any veggies or meat added is cooked prior to this as you don’t want to over cook your pizza base!

This recipe makes two, so to save yourself a job later down the line why not freeze one base?! You will thank yourself for it in future!

Hope you enjoy pizza lovers ❤️🍕

J xxx

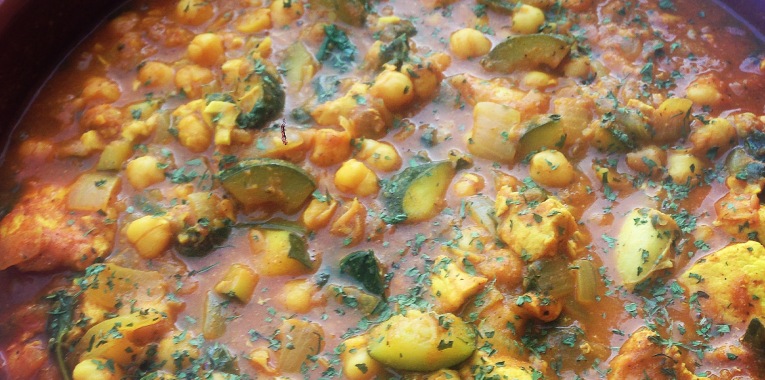
Chicken, Chickpea and Chunky Courgette Curry

img_1325

So it is now officially Autumn here in Souther Spain. Yep, that season I forgot existed. The one where you leave the house in the morning in a jumper and by midday you are sweating and in need of a dip in the pool! I have honestly completely forgotten what seasons felt like after living in Dubai for the last two years! Dubai, the sand pit city where the only seasons you see are either Summer or Hell! (a.k.a. The kinda heat that makes you feel like you are stood next to a burning bonfire kinda heat!)

Kids and changeable climates equals BUGS, and man did I catch one! Snotty, sneezey, hot one minute, then freezing the next; I honestly felt like I could sleep for days. Luckily after midday it is still hitting the mid 20 degree marks and in true Costa Del Sol style the sun is always shining, which makes me happy, even when I am unwell!

I don’t know about you, but whenever I am a little run down my appetite is HUGE and I can never seem to stop eating! I actually listen to my body and took the night off the gym… But what to eat? Decisions on food are always the hardest in my eyes, indecisive should be my middle name. Well, I knew I wanted something comforting, yet nutritious. Carby, yet healthy. Quick, yet delicious. So this dish was the one for the occasion!

I have been cooking this recipe for as long as I can remember, with the odd tweak here and there. I’ve served it as a dish when having friends over and it is always a hit! This chicken and chickpea curry is perfect whether you want to impress the in laws or just sit in your sweats with a big bowl and spoon for one (in this case it was the latter).

Here is what you will need:

  • 500grams of skinless, fresh chicken breast – diced into cubes
  • 1 medium sized courgette – diced into quarters
  • 100 grams of spinach
  • 3 cloves of garlic
  • 1 tabelspoon of curry powder
  • 2 teaspoons of cinnamon
  • 1/2 teaspoon of ground cloves
  • 1 can of chickpeas (garbanzos)
  • 1 can of tomato paste
  • 1 teaspoon of ground pepper
  • 1 teaspoon of salt
  • 1 tablespoon of lemon juice
  • 1 cup of water (can add more if the sauce thickens too much)
  • Cilantro for garnish (optional)

How to cook:

  1. Heat the olive oil and cook off the onions and chicken until the chicken is golden.
  2. Add the garlic, curry powder, cinnamon and cloves and cook until the garlic has softened and the spices are fragrant.
  3. Add the chickpeas, courgettes, spinach, tomato paste, lemon juice, salt, pepper and water then bring to the boil.
  4. Reduce heat and simmer for around 10 minutes, or until the dish comes to a nice consistency. (Think less like soup and more like stew! I personally like mine a little on the thick side.)
  5. Garnish with cilantro and serve!

img_1319

This dish takes no longer than 20 minutes and can be enjoyed on its own or with a side of rice. If you want to keep it completely Paleo, try having it with cauliflower rice. I usually would, but in this case I enjoyed it with a side of wholegrain rice and loved every bite!

I hope you like it and don’t forget to tag me in any recreations on instagram @cookeatsquatrepeat.

Sending happy vibes to you all!

J xxx


Lemon & Garlic Chili Prawns with Zoodle Linguini

image


When you come across fresh king prawns at the supermarket for 8 dirhams a pack (under 2 euros) you don’t think twice, you snap them up and run! Especially in Dubai, the food here is SO expensive! I got the last two packets left on the shelf and pretty much skipped out of there! I should probably clarify that I DID pay for them before skipping out the door… It’s definitely not worth getting locked up for the sake of 16 dizzars!

I got home and spent about 10 minutes tapping my fingernails on the kitchen counter, contemplating how I was going to cook these prawns. Curry style? Pil pil? Baked in chopped tomatoes? Too many options were running through my head! After staring in the fridge and cupboard for over 5 minutes, I finally made a decision… Hallelujah!

I experimented and came up with potentially one of my new favourite prawn recipes! A garlicky, zesty prawn linguine with a hint of chili.. taste bud tingles much! I used zoodles in replacement of pasta (obsessed with this at the moment!) by cooking them off in the same pan I sauteed the prawns in. This gave them a lovely coating which complimented the dish perfectly! I used apple cider vinegar and a splash of white wine. White wine adds a sophisticated touch to the sauce, but if you’re completely avoiding alcohol for any reason, it’s not needed, as the apple cider vinegar gives near enough the same effect. Just make sure you add a little more than mentioned below to make up for the lack of wine!

image

The experiment seemed to go well, judging by my friend Layla’s ‘mmm’ing at every bite and complimenting how good the meal was! I love feeding her, it’s great for the ego! Although, I must say I was pretty chuffed with the way it turned out myself!

Quick, easy and delicious. ( I mean the food).

Exactly what you need towards the end of a loooong week!

What you will need:

  • 650-700 grams of fresh prawns, shelled, washed and ready to cook.
  • 4 garlic cloves, sliced thinly
  • 2 small lemons, squeezed
  • 1/2 cup of spinach (optional)
  • 2 tbsp coconut oil (or choice of oil to cook in)
  • 1 large zucchini, spiralized
  • 1/4 cup of apple cider vinger
  • 1/4 cup of white wine (add more apple cider vinegar if you are not adding wine)
  • 1 1/2 tsp of chili flakes
  • 1 tsp of parsely
  • 2 tsp of basil
  • Salt and pepper to season

How to make:

  1.  Cook the garlic in 1 tbsp of oil, let simmer for 1-2 minutes before adding the prawns.
  2. Add the chili flakes, salt and pepper and cook for a further 3-5 minutes.
  3. Removed prawns from the pan and add the rest of the oil, lemon juice, vinegar and white wine. Allow sauce to simmer and get sticky in the pan.
  4. Once sticky, throw the prawns back into the pan along with the spinach, season with basil and sautee for 2 minutes.
  5. Take prawns out of the pan and into a bowl along with most the sauce, leaving some for the zucchini linguini.
  6. Throw the spiralized zucchini in the pan and cook for a few minutes until they soften.
  7. Place the zoodles on a plate and top with the prawns and rest of the sauce.
  8. Season with parsley.


I hope you guys enjoy it as much as we did! I will certainly be making this dish a regular!

Love J xx

Ps. I had some sauce leftover so added to it and baked white fish for lunch the next day and Oh. My. Gawd…. A-MAZING!

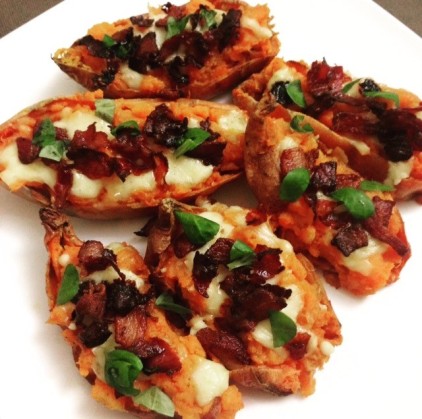
Loaded Mozzarella and Crispy Chorizo Sweet Potato Skins

Sweet pot skins


I honestly can’t remember the last time I ate loaded potato skins, which is a crime when they are SOOO good! I would always order them when I went to TGI Fridays and I still remember how deliciously greasy and crispy they were! Unfortunately, that was when I had the metabolism of a teenager and could eat what I wanted, without the worry of intolerance’s and gaining weight…. Aaaah the good old days.

Anywaaaaay, I will stop myself there before I go off on a tangent of reminiscing about my younger days! Time to share with you lovely humans MY healthy(ish) alternative to loaded potato skins, using only 3 ingredients. Yes, it is that simple, all you will need is sweet potatoes, fresh mozzarella and chorizo, then you are pretty much good to go! This recipe also works amazingly with bacon, or chopped mushrooms, I genuinely love them aaaaall! They make my tummy do a happy dance! These crispy little babies are insanely tasty! Is it frowned upon to brag about my own cooking?! I should really try being more modest…. TGI Fridays aint got sh** on me (releases inner Kanye).

I put the skins out as an appetizer when hosting a girls night, they are great finger food and sooo yummy with a sour cream dip! (Don’t fret fellow lactose intolerant friends, I have a vegan sour cream recipe which I have posted on the bottom of this post!).

Even writing about them is making my mouth water….

Here is what you need:

  • 6 small sweet potatos cut in half longways (this makes 12 skins)
  • 1/3 cup of chopped chorizo chunks (small chunks)
  • 1 large mozzarella ball
  • salt and pepper to taste

How to cook:

  1. Preheat the oven to 190 degrees
  2. Place the  oven proof dish with a drizzle of olive oil into the oven for 5 minutes. Add the sweet potato halves and cook for  25-35 minutes, dependent on the oven strength. (You can also cook them in the microwave whole if you prefer to save time, but they will come out a little mushier  than if cooked in the oven and the skin may peel away.
  3. Meanwhile fry off the chorizo pieces with some garlic for 2-3 minutes and set to one side.
  4. Once the skins are cooked and the potato is mashed, bring them out the oven. Scoop out the middle of the potato and place into a bowl.
  5. Add half the mozzarella to the potato and mix in.
  6. Dill the skins back up with the potato, sprinkle the remaining cheese on top along with the chorizo chunks, place back in the oven and grill for 5-7 minutes until the top is crispy
  7. Serve with some salsa and sour cream for dipping.


I hope you and your friends enjoy them as much as we did! You would be crazy not to really!

Love J xx

*Vegan Sour Cream:

  • 1 can of organic creamy coconut milk
  • 1 1/2 tablespoons lemon juice
  • 1/2 tablespoon apple cider vinegar
  • 1/8 heaping teaspoon unprocessed salt
  1. Chill the coconut milk in the can overnight, or 3 to 4 hours, until it thickens into a lovely cream. (Better yet, keep a can in the fridge at all times!)
  2. Flip the can upside down, open it, and pour off the thin liquid to use in something else. Scrape out the thick cream. Add the lemon juice, vinegar, and salt.
  3. Whisk until smooth and serve. (If you want it perfectly lump free, process briefly with a mini-blender, immersion blender, or mixer.)

DONE!

Thai-Style Baked Dory

BAked Dory cooked

I LOVE fish but, admittedly, I do not eat enough of it! I grew up eating fresh fish in Spain, we had the type of fish which still had its head and tails attached!  It always shocks my friends when I sit and pull a full prawn apart, they find it disgusting, but for me it is sooo normal! I ain’t scared of getting my hands dirty!

I nipped into my local supermarket on the way home and they had some Dory fish fillets on offer which caught my eye (NOT the Dory from Finding Nemo, promise) so I snapped them up with no real plan of what I was actually going to do with them. I got home to realise that my fridge was prettyyyyy empty so this recipe was a ‘throw anything I have accessible in and hope for the best’ type of recipe!

I decided I wanted to cook the fish Thai style, inspired mainly by the fact I had a lot of ginger and chilli in my fridge! (It always lasts forever!) So with the help of some freshly squeezed lime and a little bit of green curry paste, I came up with this Thai Baked Dory.

It took 5 minutes to put together and 15 minutes to bake and was so so tasty! I always find the combination of ginger, chilli and lime works so well and always tastes so fresh!

You will need:

  • Two big fillets of Dory white fish (not the cartoon character)
  • 3 teaspoons of grated fresh ginger
  • 1 medium chilli
  • 2 cloves of garlic, chopped
  • 2 limes to squeeze
  • 1 teaspoon of organic green curry paste
  • 2 teaspoon of grounded Pepper
  • 2 teaspoons of fresh parsley or coriander (I only had parsley)
  • Pinch of salt and sprinkle of sesame seeds (optional)

I baked mine on a bed of spinach, cherry tomatoes and some red onion which is totally optional but a great combination of veggies to enjoy this fish with!

How to make:

  1. Preheat the oven to 180 degrees. Prepare a glass dish by drizzling with some olive oil.
  2. Add uncooked spinach leaves, cherry tomatoes and red onion then place your fish fillets on top.
  3. Add grated fresh ginger, chopped chilli, garlic,salt and ground pepper over the fish fillets ( you can use your fingers to bed the ingredients in).
  4. Finish off by  spreading the green curry paste accross the top of the fillets and squeezing lime juice all over them.
  5. Sprinkle parsley and sesame seeds on top of the fillets and place in the oven.
  6. Cook for 15 – 20 minutes dependent on how strong your oven is.

Try not to overcook the fish as it can go quite dry! Bake it until the top coating is crispy but the inside is still quite soft.

Baked fish oven

I hope you enjoy it fellow fish lovers!

J xx

PS. I saw the new “Finding Dory” movie on Saturday and it was A-MAZING! A must watch for any Disney/Pixar fans!

Creamy Cashew and Pineapple Chicken

image

I was having one of those days where I just couldn’t decide what to cook (ok, I realise this happens more often than not!) I had a craving for a nutty chicken, like satay (or something similar) but I wasn’t entirely convinced satay would do it for me! I also kept thinking about Jamaican food, after seeing  an advert for a new restaurant which has just opened Downtown. I remember having these satay style skewers a few years ago, with little bits of pineapple and they were sooo delish!

My indecisiveness was at an all time high today (did I mention I am probably the most indecisive person you will ever meet). It’s not because I am picky, I am actually the opposite! I think its mainly because I hate ‘what if’s’… Like choosing a dish at a restaurant, what if I make the wrong choice and wish I had picked something else? It is always the way, I spend ages debating what I want, narrowing it down to 3 or 4 choices, but I will still wonder if I made the right decision, whether I enjoyed my choice or not. Foodie problems! All I was sure about this time around was that I definitely wanted chicken, in some kind of sauce and it just HAD to be nutty!

I was originally going to make some kind of creamy cashew curry but I couldn’t quite shake the image of those pineapple skewers from my mind or the thought of that Jamaican restaurant! So I went to the supermarket and bought a medium sized Pineapple with no real idea as to how it was going to turn out. I wanted it to be fruity but with a kick, a little exotic!

I went off the basics of my satay recipe but skipped the coconut milk, put a splash of fish sauce in the mix and added pineapple (funnily enough). Can I just say…. WOW. My tastes buds were in heaven! Admittedly, I had picked at half the sauce before even adding it to the chicken to cook! All for a good cause though, I had to check to see if it needed any additional ingredients adding to it… then double check, and check again jussssst to be sure! What can I  say, I am a perfectionist!

So here it is! Jamaican inspired exotic finger licking chicken for you to try maaaaan.

What you will need:

  • 500 grams of boneless chicken breast
  • 1 small cauliflower head
  • 2 cups of diced pineapple (Cut the pineapple in half, length ways and scoop out the middle –  Don’t throw the pineapple shell away if you want to use it to serve food in!)
  • 1 red onion (1 half to be diced and 1 half to be blended)
  • Small red pepper
  • Juice of 1 lime
  • Half a cup of natural cashews
  • 1 tablespoon of cashew butter (Peanut butter would work nicely too but stay clear if you want this to be completely Paleo)
  • 1 tablespoon of organic, natural honey
  • 1 whole chilli, deseeded
  • 2 cmall galric cloves (to chop and add when baking the chicken)
  • 1 teaspoon garlic powder
  • 1/2 teaspoon of powdered ginger
  • Salt and Pepper to season
  • A handful of cahsews to chop and sprinkle on top (optional)

How to make the sauce:

Blend all the ingredients in a food processor apart from – Half red onion, galic cloves and red pepper. This is to be left to one side and added to the chicken when roasting in the oven.

How to make the cauliflower rice:

Add chopped cauliflower head to blender until a ‘rice’ texture is formed. Add a dash of cumin, pinch of pepper and thyme for taste.

Cooking guide:

  1. Preheat the oven to 180 degrees
  2. Dice the chicken into cubes and add the chopped onion, chopped garlic and red pepper. Season with salt and pepper and drizzle with some olive oil.
  3. Add half the sauce to the chicken and stir, ensuring it is covered fully.
  4. Put in the oven for 20-25 minutes (dependent on the strength of your oven, mine was done after 22 minutes!)
  5. Meanwhile heat some coconut oil in a pan and add your ‘rice’ to it. Cook for 3-5 minutes continually stirring it to ensure it doesn’t stick. Season as you wish!
  6. Serve the chicken with cauliflower rice and sprinkle with chopped cashews. You should have enough sauce left to have a little jar for dipping…. it is extremely moreish so this is recommended!

This recipe is guaranteed jamaic-ya crazy! (Such a bad pun but I could not resist)

Love J xxx


Paleo Sweet Potato & Spinach Gnocchi

image

What do you get when you put a sweet potato loving (slightly hungover) Italian girl in the kitchen…?? Sweet Potato and Spinach Gnocchi of course!

I’ve had this recipe on my mind for quite some time, it was simple really, I love gnocchi and I love sweet potato, so why not create a way to love them together?! What makes these babies even better is they are totally gluten and dairy free!

Before we go any further, I wanted to clear one thing up. I’m sure a lot of you may be wondering why I never cook with normal white potatoes, but the truth is (nutritional reasons aside) I just prefer the taste of sweet potatoes. Even when I order fries at a restaurant, I always go for the sweet kind! This is not only because I stick to eating complex carbs, but also because white potatoes often leave me feeling bloated and uncomfortable. So I guess it is just personal preference!

Now back to the recipe; I feel I need to warn you before we go any further (especially If you haven’t tried gnocchi before) to prepare yourself for the carb coma you will experience after a bowl (or three). It is one of those dishes that has you coming back for more, no matter how full you feel and it WILL have you feeling like you have committed carbocide! But I promise you it is totaaaally worth it!

This was quite a nostalgic dish for me to cook as I have fond memories of eating gnocchi as a child growing up. I remember helping my parents make the gnocchi, it was always so messy and took forever! I’d help roll and chop the dough, I got flour everywhere, and It always felt like I was waiting around for hours to be fed! With that in mind I was quite surprised when this whole meal only took me 30 minutes to make from start to finish… Result!

What are you waiting for? Have a go for yourselves!

What you will need for the Gnocchi:

  • 1 large sized sweet potato
  • 1/2 cup coconut flour
  • 1 egg
  • 1/2 teaspoon salt
  • 2 handfuls of spinach leafs, sauteed
  • 2 tablespoons olive oil
  • 2 teaspoons cornstarch

Get cooking!

  1. Boil/bake/microwave your sweet potato until it is soft and can be mashed. I microwaved mine to reduce any chance of sloppiness!
  2. While the potato is cooking saute your spinach with garlic. Then mix the coconut flour, egg, salt, and olive oil in a large bowl.
  3. Once cooked, peel the the sweet potato then mash it in a separate bowl. Once mashed add it to the bowl with the flour, egg, salt and olive oil then mix in the sauteed spinach.
  4. Use your hands to kneed the ingredients into a dough, gradually sprinkling in the cornstarch into the mixture.
  5. Now form the gnocchi balls by using your hands (I used the back of a teaspoon to measure mine so they were all roughly the same size! This helps when cooking as they should all be ready around the same time!)
  6. Cook the gnocchi in a big pan of already boiling water for no more than 2-3 minutes or until they pop up to the top. As these are not made with regular potato and flour they will seem a lot more soggy than usual gnocchi so I finished them off by throwing them in a saute pan for 1-2 minutes. Make sure to the stir the balls continuously or shake the pan by the handle to keep the balls from burning.

OK so now I have given you the recipe for possibly the yummiest Paleo friendly sweet potato gnocchi EVER (I am biased I know). Its time to decide on what sauce to enjoy them with… Oh the choices!

I would usually advise you to go for something light, like a plain tomato pasta sauce or a arrabiata sauce, but that would make me extremely hypocrytical as I had mine with a tomato and Italian sausage sauce! Mmmmm! I also may, or may not, of had a generous serving of fresh parmesan on top… Please don’t judge me, It was cheat day!

SO if you are feeling a little adventurous and fancy a bit of meat to go with these little balls of heaven, why not try the sauce for yourself?

Here is what you will need:

  • 4 Italian sausages
  • 1 tin of organic chopped tomatoes
  • 2 garlic cloves, finely chopped
  • 1 small red onion, finely chopped
  • fresh basil and oregano to season
  • Tablespoon of balsamic vinegar (Would be lush with red wine but unfortunately I live in Dubai and wine isn’t that easy to buy!)

How to make the sauce:

  • Chop the sausages into small chunks and cook in some olive oil on a medium heat with the garlic and onion
  • Once browned add the chopped tomatoes, balsamic vinegar and herbs then simmer for  5-10 minutes.

The sauce will always be tastier the longer it is left so it is advisable to make it before anything else! Although I made mine very last minute and it was still delish!

Cue the carb coma!

J xx


Broccoli crust Pizza with Crispy Chorizo and char-grilled Vegetables

IMG_6266.JPG


You know those hangovers that don’t kick in until day 2? Yeah, well that was my day yesterday…. Hello Hangover! Work felt like a blur all day, my head was pounding and no amount of water I drank or ibuprofen I popped was helping. It felt like the longest day of my life (Not helped by the fact we have to work Sundays in Dubai!).

Anyway, the day finally came to an end and I was secretly regretting organising a gym session with my housemate (Sorry Kels). Mainly because all I wanted to do was eat pizza and sit in my pj’s all night! BUT, I dragged myself there and actually felt amazing after it! We did a really intense full body HIIT style circuit which left us pretty dead after 4 rounds and very hungry…

My friend Zoe was coming over for a movie night and mentioned ordering a pizza in, but there was no way I could justify a greasy pizza after such a good workout! So in true Justy style I cooked up the next best thing, which actually is better than the real thing in my opinion! I guess I need to leave that for you guys to try and decide for yourselves hey…

So here it is, Broccoli crust Pizza with Crispy Chorizo and Char-grilled veggies:

What you will need for the pizza crust

  • 1 large Broccoli head, chopped
  • 2 eggs
  • 1 tablespoon of olive oil
  • 1 small red onion
  • 2 garlic cloves
  • Salt and Pepper to season
  • 1 teaspoon of Italian seasoning

How to make the base:

Pre-heat the oven to 190degrees.

Blend all the ingredients in a food processor. If using a Nutribullet I suggest you add the broccoli heads gradually and scrape the sides in between blending. It should take around 10-15 minutes of blending to get desired dough like texture.

Line a baking tray with parchment paper and spread the mixture into 2 medium sized pizzas (I  made 3 mini pizzas this time around but made 2 medium ones out of the same ingredients last time I made this dish!)

Place in the oven for around 10-15 minutes or until the pizza crust looks to be browning.

For Pizza topping:

I blended organic raw passata with some oregano, garlic, salt and pepper for my tomato base. Spoon it onto your pizza and spread evenly ready for adding the toppings.

Now for the fun and creative part! I’ve made this recipe a few times and every time tried a different topping… I have put Cajun spiced chicken, spinach, roasted veggies with a baked an egg in the middle on top before, which was delicious!                           Last night however my taste buds were craving some traditional Spanish Chorizo! (Dubai struggles)

I chargrilled lots of different vegetables: Eggplant, red peppers, yellow peppers, green peppers, red onion and mushrooms but again go for what you love, it is your pizza after all! Then I fried off my chopped chorizo for 2 minutes in a pan with some paprika and garlic  to ensure it was a little crispy! I then added some fresh mozzarella to my pizza base (You can choose desired cheese) before sprinkling the vegetables and chorizo on the top. Then place the pizzas back in the oven for 5-10 minutes to allow the cheese to melt.

No greasiness, no gluten, light on the tummy and more than satisfying to those pizza cravings…This recipe really does have a pizza my heart. (Ok I will shut up now)

ENJOY pizza lovers! J x


Orange, Lemon & Herb Roasted Chicken

IMG_5868

Ok so I know sticking to a high protein, low carb diet can be a little tedious at times. I sometimes feel like all I eat is chicken and vegetables or salad… I have friends saying “Don’t you get bored of eating the same way all the time?” or “How can you be bothered to cook so often?!” The truth is I rarely eat the same dishes and what is two nights out of your week when it contributes to long term results?! I mean realllyyyy!


I did NOTHING with my day off Saturday,mainly  due to overindulging at brunch Friday. By nothing I mean sweet FA, no food shopping, no food prep… I was literally a slave to my bed.  The guilt had well and truly kicked in by 7pm, which drove me to set a 6.30am gym date on Sunday before work (Just the thought of it was making me feel slightly queasy). But as always I was so glad I dragged my ass out of bed!  Not only did it mean that I had got my gym session done  by 7.30am, but it also meant I had the whoooole evening to do all the things I should of done Saturday…. FOOD PREP!

I always like to experiment with my poultry and play around with recipes and I was feeling extra adventurous last night so decided to try something totally new! Some recipes turn out better than others, obviously, but 9/10 times it is a success and this dish was a 12/10!

This is a Orange, Lemon and Herb Roasted Chicken. It came out ridiculously tender and juicy with a perfect kick to it!

Here is what you will need chicken lovers:

2 large chicken breasts, sliced
2 oranges, sliced
1 lemon, sliced
1 onion, diced
1 cup fresh orange juice (1 large orange squeezed)
1/2 cup fresh lemon juice (1 medium lemons squeezed)
1/4 cup olive oil
4 cloves garlic, minced
1/2 tbsp dried oregano

1/2 tsp paprika
1/4 tsp Chilli flakes (optional)
1 tsp of thyme
1 tsp of fresh rosemary sprigs
Sea salt and freshly ground black pepper

Get cooking!

Preheat your oven to 190degrees.
In a bowl, combine olive oil, garlic, orange juice, lemon juice, dried oregano, paprika, diced onion, chilli flakes, and season with salt and pepper to taste.

Place half the orange slices and half the lemon slices at the bottom of a baking dish.
Place the chicken pieces on top of the sliced orange in the baking tray then top the chicken with the thyme, rosemary, and remaining orange and lemon slices.
Drizzle the orange-lemon juice mixture all over the chicken.

Place in the preheated oven and bake, uncovered, for 45 to 60 minutes.

I made some garlic cauliflower mash and Mediterranean oven roasted veg to go with mine which works just perfectly!


Chilli, Ginger & Sesame Beef Stir Fry with Zoodles

IMG_5531

I’ve actually had a social this week (go me!) resulting in me having NO time to cook, so tonight I took full advantage of no plans, wacked on my pjs and created this quick but delicious meal…. I present to you my Chilli, Ginger and Sesame Beef Stir fry with Zoodles!

Now, personally, I can live without noodles in my stir fry, BUT the one thing I can’t live without is no sauce! I mean, what is a stir fry without sauce? Reallly?!?!?

Unfortunately, like most packaged foods, the jars and sachets you get in the supermarket are packed with E numbers and sugars and all other nasty stuff, but don’t fear because I have come up with an awesome alternative so you won’t feel like you are missing out on the sauciness!

Lets get saucy!

Simply blend or add to pan whilst cooking the following ingredients:

  • 1  Chilli de-seeded and chopped
  • 3 teaspoons of chopped ginger
  • 2 cloves of garlic
  • 2 Tbs of sesame oil
  • 1 tbs of honey
  • 1 teaspoon of ground pepper
  • Pinch of salt

*Pssst! You can add more or less of certain ingredients until you get desired taste, I personally love the kick of chilli & ginger combined with the sweetness of the honey. So feel free to have a play with this one until you feel you have the acquired taste for you! You can even create the sauce while your stir fry is cooking by adding the above ingredients to the wok as you go!

For the Stir Fry

There is no right or wrong when it comes to what vegetables should go into a stir fry, I usually throw in whatever veggies I have in the fridge at the time! The ‘wing it’ approach always seems to work for me!

The contents of veggies in my fridge were just perfect and very fitting to my Thai inspired dish, here is what i threw into my wok of wonders:

  • 500gr of lean beef strips (chicken or prawns would also be great for this dish)
  • 1 red onion chopped
  • 1/3 cup of mixed bell peppers
  • 1/3 cup of courgettes/zucchini cut into chunky quaters
  • 1/3 cup of chopped up egg plant
  • 1/2 cup of broccoli cut up (with stems)
  • 1 cup of fresh bean sprouts
  • 1 cup of red cabbage
  • 1/4 cup of sesame seeds
  • 2 teaspoons of chilli flakes (added option for those who like it hot!)
  • 1 large courgette/Zucchini not chopped (This is to use later for the Zoodles)

Method:

Heat some coconut oil/olive oil in a wok add the onion, broccoli,egg plant and courgettes/zucchini for a few minutes before adding the beef. (Adding the beef too early can lead to it becoming overcooked and chewy! urgh). Add the beef, peppers and the sauce and cook for a further 4-5 minutes before adding the rest of the ingredients. 2-3 more minutes of cooking and you should be good to go. Serve straight out the wok and serve on top of a bed of Zoodles (See below for recipe).

*Psst! I always leave adding the cabbage, beansprouts and spinach right to the very end as I prefer a crunch to my stir fry!

IMG_5592

Oodles of Zoodles!

All you need for this is a big courgette/zucchini and grater. It really is as simple as that!

Grate the courgette/zucchini length ways using the thicker side of the grater (to create desired “noodle” shape). Grate until you reach the core, it will usually become floppy and may even snap if over grated!

Once you have grated your zoodles heats some coconut oil in a pan and fry for 2-3 minutes seasoning with a pinch of salt and pepper! Simple as that!